When it comes to managing your home network, knowing how to access the settings of your Netgear router is crucial. The key to this process is understanding the Netgear router IP address. This address serves as a gateway, allowing you to log into your router’s administration panel to configure settings, apply updates, or even troubleshoot connection issues. In this article, we’ll cover the steps involved in how to find the Netgear router IP address, as well as provide guidance on accessing and managing your router settings effectively.
Contents
- 1 Understanding Your Netgear Router IP Address
- 2 How to Find Your Netgear Router IP Address
- 3 Accessing Netgear Router Settings Using IP Address
- 4 The Importance of Router Security Settings
- 5 Changing Netgear Router IP Address Settings
- 6 Troubleshooting Netgear Router IP Connection Issues
- 7 Frequently Asked Questions (FAQs)
- 8
- 9 Conclusion
Understanding Your Netgear Router IP Address
A router IP address is a unique identifier within your network. This number is essential for any networking device. The default IP address for most Netgear routers is either 192.168.1.1 or 192.168.0.1. However, depending on your specific model and configuration, this may vary. To better manage your network and ensure optimal performance, you need to be familiar with your Netgear router’s IP and how to access it.
The Netgear router IP address is crucial for accessing the settings. This address can usually be found in the documentation that comes with your router. If you don’t have access to this information, there are simple methods to uncover it, which we will discuss later in the article. Knowing how to access Netgear router settings using this IP address can help you manage everything from wireless settings to parental controls and security preferences.
How to Find Your Netgear Router IP Address
Finding the IP address of your Netgear router is relatively straightforward. Here are several methods to tackle this task:
Method 1: Check Default IP Address
The most effective way to find your Netgear router IP address is to refer to the manual or any documentation that came with your router. Generally, the IP addresses for Netgear devices are one of the following:
- 192.168.1.1
- 192.168.0.1
You can input either of these addresses into a web browser’s address bar to see if you are granted access to the router’s settings.
Method 2: Use Command Prompt (Windows)
If you’re using a Windows device, you can quickly find your router IP address through the Command Prompt:
- Press Windows Key + R to open the Run dialog.
- Type
cmdand press Enter. - In the Command Prompt window, type
ipconfigand press Enter. - Look for “Default Gateway” under your active network connection; this often lists your router’s IP address.
Method 3: Use Terminal (Mac)
For Mac users, the Terminal application offers a similar capability:
- Open Terminal from the Utilities folder or Spotlight.
- Type
netstat -nr | grep defaultand press Enter. - Note the IP address shown next to the “default” entry; this is your router’s IP.
Method 4: Router’s Web Interface
If you’re already connected to the network, you may also access the router’s web interface directly through your browser. Simply attempt to navigate to the general default IP addresses listed above.
Accessing Netgear Router Settings Using IP Address
Once you have the Netgear router IP address, accessing your settings is a straightforward process. Follow these steps:
- Open your web browser.
- Enter the IP address you discovered into the address bar and hit Enter.
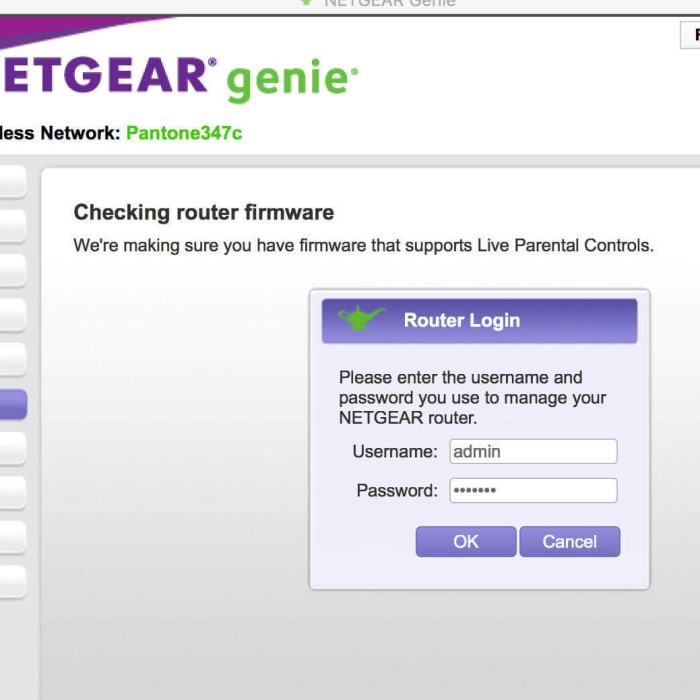
- You will be prompted to enter your login credentials. By default, the username is typically admin, and the password is password. If these credentials do not work, check any documentation that came with your router or the bottom of your device for the default login information.
- Upon successful login, you’ll gain access to the Netgear router settings dashboard. Here, you can adjust numerous configurations ranging from Wi-Fi settings, security options, connected devices, and more.
The Importance of Router Security Settings
When you’ve gained access to your Netgear router settings, ensuring the security of your network should be your top priority. Here are some essential settings to consider adjusting:
- Change Default Login Credentials: The default username and password are well-known and easily exploitable by unauthorized users. Change them to something unique to prevent access to your network.
- Update Router Firmware: Regularly updating your router’s firmware can resolve vulnerabilities and improve performance, ensuring that you are indeed using the best version available.
- Enable WPA3 Encryption: If supported, enabling WPA3 offers improved protection compared to older encryption methods.
- Disable WPS: Wi-Fi Protected Setup (WPS) can lower your network security. Disabling this feature may help reduce vulnerabilities.
Changing Netgear Router IP Address Settings
Occasionally, you may need to change the Netgear router’s IP address, particularly for advanced networking needs. This can improve network management or resolve conflicts that may arise. Here’s how to change the router’s IP address settings:
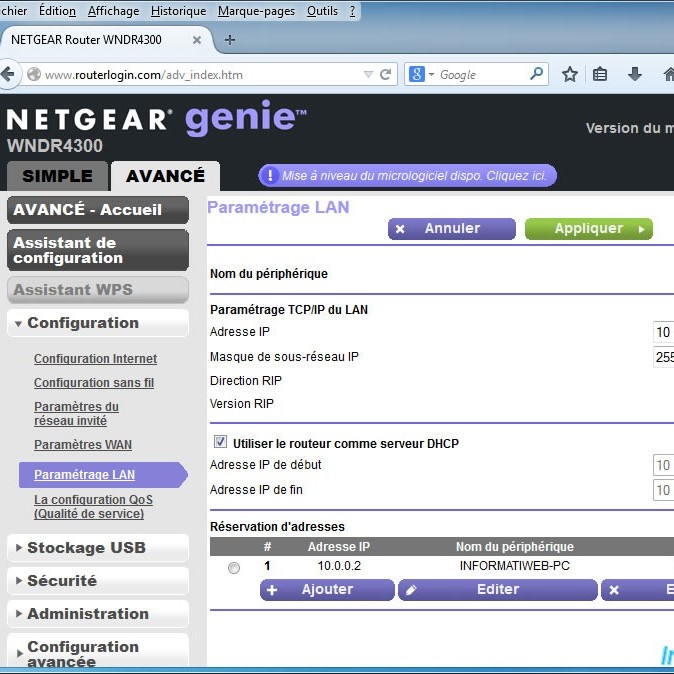
- Log into the Router Interface: Use your router IP to log in as discussed earlier.
- Navigate to LAN Setup: Look for the section titled LAN Setup or Network Settings.
- Modify IP Address: Here, you can change the router IP address. For example, you might switch from 192.168.1.1 to 192.168.1.2. Make sure to note your new IP address for future reference.
- Save Settings and Reboot: After making changes, be sure to save them and reboot your router if prompted to ensure they take effect.
It’s essential to understand that any devices connected to your network may need to be rebooted or reconfigured to recognize the new IP address if you change it.
Troubleshooting Netgear Router IP Connection Issues
If you face issues accessing your router’s settings or connecting to the internet, the following troubleshooting tips might help resolve common connection issues:
Check Device Connection:
Begin by confirming that your device is properly connected to the router’s network. If you are using Wi-Fi, ensure that you are connected to the correct network name (SSID) associated with your router. For Ethernet connections, make sure the cable is securely plugged into both your device and the router. Verifying the connection can often resolve many initial connectivity problems, as an unstable or disconnected device is frequently the source of the issue.
Restart Your Router:
Sometimes, a simple restart of your router can resolve various connectivity issues. To do this, locate the power button on your router, turn it off, and wait for about 10 seconds before turning it back on. Alternatively, you can unplug the router from the power source. This process helps clear temporary glitches and refreshes the router’s connection to the internet, potentially restoring connectivity to any devices that were having trouble.
Clear Browser Cache:
In some cases, issues with your web browser’s cache can hinder your ability to access the router’s interface. Cached data may cause conflicts or display outdated information. To address this, clear your browser’s cache and cookies. This process varies slightly depending on the browser you use, but you can typically find the option under settings or preferences labeled ‘Clear browsing data’ or similar. After clearing the cache, attempt to access the router’s interface again for a fresh start.
Temporarily Disable Firewall:
If you are using advanced firewall settings on your device, it is possible that these settings could be blocking your connection to the router. Firewalls are designed to protect your network, but at times they may inadvertently restrict access. As a troubleshooting step, consider temporarily disabling your firewall to see if it resolves the issue. After disabling the firewall, try to access the router’s interface again. If successful, remember to re-enable the firewall afterwards to maintain your network security.
Reset the Router to Factory Settings:
If none of the previous steps have worked, you may need to consider resetting your router back to its factory settings. This process will revert all settings, including Wi-Fi names, passwords, and any customized configurations, back to their original state. To reset your router, locate the reset button (usually a small pinhole on the back or bottom of the router) and press it for about 10 seconds using a paperclip or similar object. Keep in mind that after the reset, you will need to set up your network from scratch, so it’s advisable to note down any important configurations beforehand.
Frequently Asked Questions (FAQs)
How do I find my NETGEAR router IP address?
To find your NETGEAR router IP address, check your router’s documentation for the default IP, or you can use Command Prompt or Terminal to find the “Default Gateway.”
How do I log in to my NETGEAR router?
You can log in to your NETGEAR router by entering its IP address into a web browser and using the default username and password, typically “admin” and “password.”
What is the 192.168.0.1 router IP address?
The IP address 192.168.0.1 is a common default IP address used by many NETGEAR routers, allowing users to access the router settings page.
Is 192.168 my IP address router?
Generally, 192.168.x.x addresses are local IP addresses used on private networks, including home routers like NETGEAR.
Conclusion
In conclusion, understanding your Netgear router IP is vital for navigating your network settings efficiently. Whether you want to configure settings, change security options, or troubleshoot connection issues, knowing how to find the Netgear router IP address and access it effectively simplifies the process. By following the guidelines outlined in this article, you can effectively manage your home network while ensuring security and optimized performance. Remember to regularly check your settings and perform updates as needed, as maintaining a secure network is key to a smooth online experience. Don’t hesitate to employ troubleshooting tips when faced with connectivity challenges. Regular monitoring and updates can lead to a better, more secure internet experience for all devices on your network.