Contents
- 1 Introduction to Connecting Antennas to Samsung TVs
- 2 Check Compatibility of Your Samsung TV
- 3
- 4 Preparing the Antenna
- 5
- 6 Connecting the Antenna to Your Samsung TV
- 7 Channel Scanning and Setup
- 8 Tips for Improving Signal Reception
- 9
- 10 Troubleshooting Common Issues
- 11 Alternatives to Traditional Antennas
- 12 Conclusion: Enjoying Local Broadcasts with Antennas
Introduction to Connecting Antennas to Samsung TVs
If you’re considering cutting the cable cord, connecting an antenna to your Samsung TV is a fantastic option to access local broadcasts without incurring monthly fees. Knowing how to connect antenna to samsung tv can seem daunting, but armed with the right information, it can be a straightforward process. This article provides comprehensive steps and tips to help you efficiently set up your antenna, ensuring you receive clear signals for your favorite channels.
Transitioning to an antenna-based setup can save you money, while still allowing you to enjoy popular shows, live sports, and news. Let’s explore the essential steps involved in this installation, the equipment needed, and troubleshooting methods to address any signal issues you might encounter.
Check Compatibility of Your Samsung TV
How to connect antenna to samsung tv? Understanding compatibility is essential before connecting an antenna to your Samsung TV. Samsung TVs come with different features, so you need to ensure yours can support the antenna connection process.
Identifying Built-in Tuner
A built-in tuner lets your TV pick up over-the-air signals from antennas. Most Samsung TVs feature this capability. To check, look for labels such as “ATSC” or “Digital Tuner” on the specs sheet or packaging. You can also access the TV’s settings menu to confirm if the tuner is present.
If your TV lacks a built-in tuner, you’ll need an external digital converter box. This device enables TV signal decoding and plays over-the-air broadcast channels on your screen.
Types of Antennas Supported
Samsung TVs work with various antenna types, depending on your signal reception needs:
- Indoor Antennas: Best for areas near broadcast towers. Small, easy to install, and widely available.
- Outdoor Antennas: Ideal for rural locations or places far from signal sources. Provide stronger reception.
- Amplified Antennas: Enhance weak signals by boosting performance. Beneficial in areas with poor coverage.
Ensure the antenna you choose matches your TV’s input port (usually coaxial). Proper compatibility ensures smoother setup and better viewing quality.
Preparing the Antenna
Proper preparation ensures smooth installation and optimal signal reception. Here’s what you need to do:
Choosing the Right Antenna for Your Location
Selecting the correct antenna depends on your geographical location and distance from broadcast towers:
- Urban Areas: An indoor antenna works best for urban environments with strong signals. These are compact, easy to set up, and ideal for apartments or homes near signal towers.
- Suburban Areas: Consider using an amplified antenna if you live farther from the towers. It boosts weak signals and improves viewing quality.
- Rural Areas: An outdoor antenna is the most reliable choice for areas far from broadcast sources. These provide excellent reception but require proper placement for effectiveness.
Research your local broadcast tower locations. Online tools like signal maps can guide your antenna selection.
Assembling the Antenna
Once you have the right antenna, follow these steps to assemble it:
- Unbox the Antenna: Carefully unpack all components, including screws, mounting brackets, and cables.
- Follow the Instructions: Refer to the manual for assembly guidance. It usually provides step-by-step visuals.
- Attach Brackets: Connect mounting brackets if you’re using an outdoor antenna. This ensures secure installation.
- Connect the Cable: Attach the coaxial cable to the antenna. Ensure a tight and secure connection.
- Test Before Final Placement: Connect it to your TV and test signal reception before finalizing its position.
Proper assembly ensures that your antenna functions effectively and consistently delivers crystal-clear signals.
Connecting the Antenna to Your Samsung TV
Connecting an antenna to your Samsung TV is a quick and simple process. With proper steps, you can enjoy high-quality over-the-air channels without any hassle.
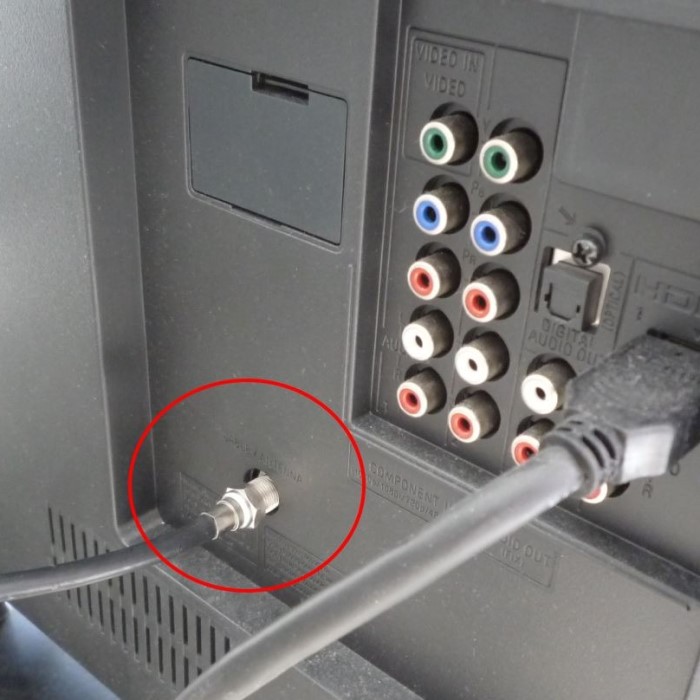
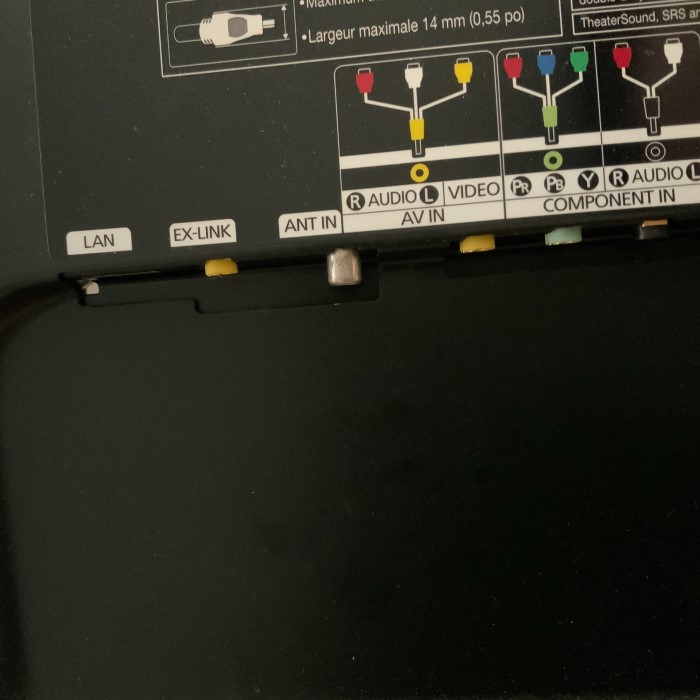
Locating the Antenna Input Port
Locate your TV’s antenna input port before connecting the antenna. Most Samsung TVs have a coaxial input port marked as “ANT IN” or “RF.” This port is usually found on the back panel of the TV.
Here’s how to find it:
- Inspect the Back Panel: Look closely for the label “ANT IN.”
- Check TV Manuals: If the port is hard to find, refer to the TV manual.
- Ensure Accessibility: Ensure you can easily access the port for a secure connection.
Knowing the port location helps simplify the connection process and prevents errors.
Properly Plugging in the Antenna Cable
Once you find the input port, follow these steps to plug in the antenna cable correctly:
- Align the Cable: Position the antenna cable connector to match the port shape.
- Insert the Cable: Push the connector into the port firmly. It should fit snugly.
- Secure the Connection: Twist the cable lightly to ensure it’s secure—no loose fitting.
- Avoid Over-Tightening: Do not tighten too much, as this may damage the connector or port.
Double-check the connection to prevent signal loss. A properly connected antenna guarantees optimal performance.
Channel Scanning and Setup
Scanning for channels ensures your antenna delivers all available broadcasts to your Samsung TV. This process helps your TV identify over-the-air channels and integrate them into the viewing menu.
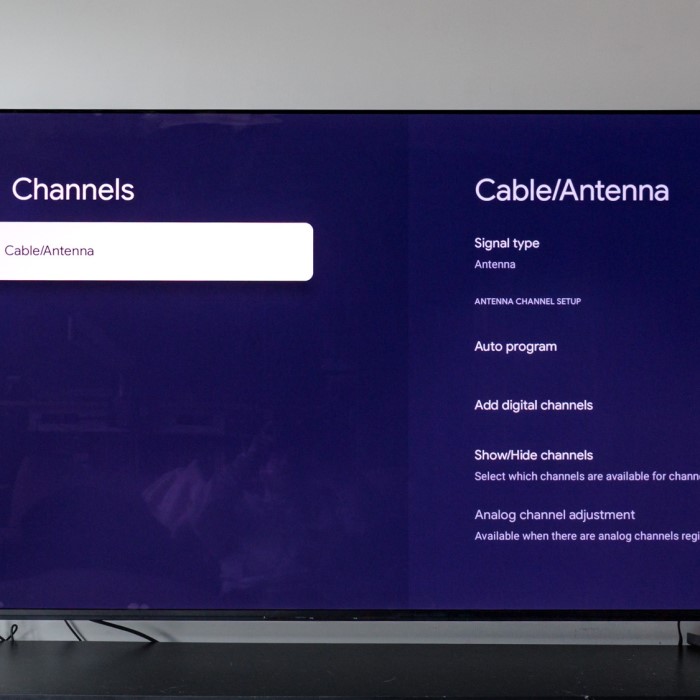
Accessing the TV Menu for Channel Search
To start scanning for channels, access your TV’s menu. Follow these steps to get started:
- Press the Menu Button: Locate and press the “Menu” or “Home” button on your remote control.
- Navigate to Settings: Select the “Settings” option using your remote.
- Locate Broadcast Settings: Within settings, choose the “Broadcast” or “Channels” tab.
- Select Channel Search/Program: Click on “Channel Search,” “Auto-Tune,” or “Program Channels” depending on your TV model.
Accessing this menu ensures you begin the setup for identifying over-the-air channels correctly.
Performing Auto Program or Channel Scan
Once in the channel search menu, initiate an auto program or channel scan. Here’s how:
- Choose Antenna as Signal Source: Select “Antenna” instead of “Cable” to activate over-the-air scan.
- Start the Scan: Click “Start” to begin scanning for available channels.
- Wait for the Process: Allow the TV to complete scanning, which may take a few minutes.
- Review Channels: Check the list of channels detected after the scan finishes.
Using auto programming simplifies the process, and you ensure you capture all available broadcasts.
Resolving Common Channel Search Problems
Channel search may encounter issues like missing or pixelated channels. Troubleshooting steps include:
- Check Cable Connection: Ensure the antenna cable is secure and properly connected to the TV port.
- Reposition Antenna: Adjust the antenna direction to improve signal reception. Test multiple positions.
- Repeat the Scan: Perform another auto scan after repositioning the antenna.
- Inspect Signal Strength: Access the signal strength indicator in the TV settings for further insights.
Resolving these challenges ensures smooth channel setup and uninterrupted viewing.
Tips for Improving Signal Reception
Getting the best signal for your Samsung TV can enhance your viewing experience. Simple adjustments and tools can make a big difference in signal quality.
Adjusting the Antenna Position
Positioning your antenna correctly is crucial for optimal signal reception. Follow these steps to adjust it:
- Move the Antenna Higher: Place the antenna in a high, unobstructed location for better signal capture.
- Change Direction: Point the antenna toward nearby broadcast towers. Use online signal maps to find tower locations.
- Avoid Obstacles: Keep the antenna away from walls, heavy furniture, or metallic items that block signals.
- Test Positions: Test multiple placements to find the best signal strength.
Make small, incremental adjustments and test the channels each time to identify the prime spot for strong reception.
Using Signal Amplifiers
Signal amplifiers boost weak over-the-air signals, improving TV reception in low-coverage areas. Here’s how to use them:
- Choose an Amplifier: Select a signal amplifier compatible with your antenna and Samsung TV setup.
- Connect to Antenna: Attach the amplifier to the antenna cable securely.
- Power the Amplifier: Plug it into a power source or USB port on your TV.
- Test Signal Strength: Run a channel scan after connecting the amplifier to assess its effectiveness.
Signal amplifiers are particularly useful in rural or suburban areas where signal strength is inconsistent.
By following these tips, your Samsung TV can deliver clearer pictures and uninterrupted broadcasts.
Troubleshooting Common Issues
When setting up an antenna for your Samsung TV, you may encounter common problems. These issues can disrupt your viewing experience and signal reception. With simple fixes, you can resolve them effectively.
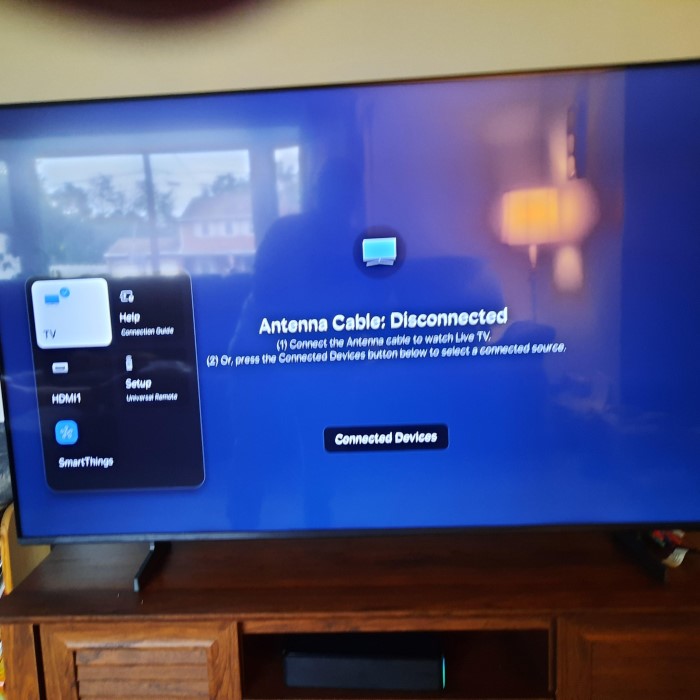
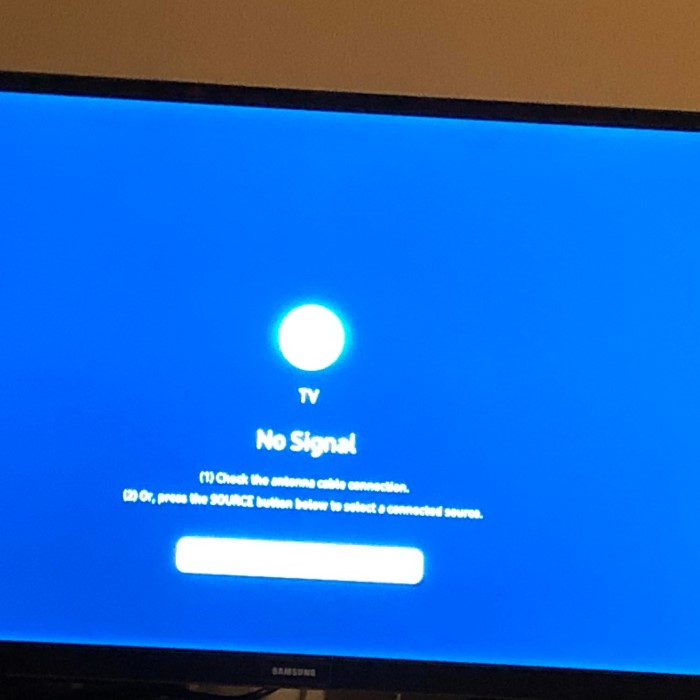
No Signal Error
A “No Signal” error occurs when the TV fails to detect active signals. Follow these steps to fix it:
- Check Cable Connection: Ensure the antenna cable is firmly plugged into the TV’s input port.
- Verify Antenna Position: Place the antenna where it can receive strong signals, such as near windows.
- Run Channel Scan: Go to the settings menu and perform an auto program or channel scan.
- Inspect Signal Amplifier (if used): Ensure the amplifier is powered and connected properly.
- Restart TV: Power off your TV, wait a few seconds, and turn it back on.
Resolve the “No Signal” error quickly by rechecking all setup components.
Pixelated or Missing Channels
Pixelated or missing channels are caused by weak signal reception. Try these solutions:
- Reposition the Antenna: Adjust the antenna’s direction toward broadcast towers for better reception.
- Elevate Antenna Location: Position the antenna higher or outdoors for stronger signals.
- Check Cable Condition: Inspect the coaxial cable for damage or loose connections.
- Use a Signal Amplifier: Boost weak signals with an amplifier compatible with your Samsung TV.
- Rescan for Channels: Perform another channel scan after repositioning and adjustments.
If pixelation persists, test the TV in another room or upgrade to a better antenna.
By addressing these common problems, you can enjoy smooth viewing of over-the-air channels on your Samsung TV.
Alternatives to Traditional Antennas
When traditional TV antennas aren’t an ideal option, other methods can help you access local channels. These alternatives are convenient, cost-effective, and easy to set up.
Using HDTV Antennas
HDTV antennas are advanced versions of traditional antennas, offering various benefits:
- Better Signal Quality: HDTV antennas provide clearer HD channels compared to standard antennas.
- Compact Design: They are smaller and sleeker, fitting seamlessly into modern home setups.
- Indoor and Outdoor Options: Available in both types, suitable for different reception needs.
- Easy Installation: HDTV antennas are easy to set up with plug-and-play functionality.
For optimal performance, ensure the HDTV antenna is compatible with your Samsung TV. Check the specifications and connection type before purchasing.
Utilizing Streaming Services for Local Channels
Streaming services offer another way to watch local channels without relying on an antenna. Here’s how:
Select Compatible Platforms
- Research Streaming Services: Begin by exploring various streaming services that offer live television options. Popular platforms like Hulu + Live TV, YouTube TV, and Sling TV frequently include local stations in their channel lineup.
- Check Channel Availability: Before committing to a service, ensure that it provides the specific local channels you want to watch. Channel offerings may vary by location, so it’s crucial to verify that your preferred stations are available in your area.
- Consider Bundles: Some services may offer bundles that include additional channels or premium networks. Compare these packages to find one that suits your viewing preferences and budget.
Sign Up
- Choose the Right Plan: Once you’ve selected a service, review the different subscription plans available. Each plan may offer varying amounts of channels, features, or pricing options, so choose the one that aligns with your needs.
- Select Your Payment Method: During the signup process, you will need to enter your payment information. Many services offer free trials, which can be a great way to test out the features before committing to a paid subscription.
- Confirm Your Subscription: After completing the process, ensure that you get a confirmation email confirming your subscription status. Keep this email handy for any future reference.
Set Up Your TV
- Install the Streaming App: If you plan to watch through your Samsung TV, navigate to the Samsung Smart Hub. Search for the streaming app relevant to the service you subscribed to (e.g., Hulu, YouTube TV, Sling).
- Download the App: Follow the prompts to download and install the app directly onto your TV. Make sure your TV is connected to the internet to complete this step successfully.
- Log In to the App: After installation, open the app and enter your login credentials (email and password) that you used during the signup process. This will give you access to your personalized viewing experience.
- Connect an External Media Device (Optional): If your TV does not support the streaming app, consider using an external media device, like a Roku, Amazon Fire Stick, or Apple TV. Connect the device to your TV and then install the relevant app to access live TV services.
Enjoy Live Channels
- Explore the App Interface: Once logged in, take a moment to familiarize yourself with the app’s interface. Most streaming services offer easy navigation to browse live TV channels, on-demand content, and more.
- Access Live Broadcasts: Look for a section labeled “Live” or “Live TV” within the app. This will allow you to access all available live broadcasts directly through the app interface, just like you would with traditional television.
- Customize Your Experience: Many services allow you to create a list of favorite channels for quicker access. Take advantage of this feature to streamline your viewing experience.
- Watch and Enjoy: Now you can start watching your local broadcasts and other live programming, enjoying the convenience of streaming from your Samsung TV or compatible device.
Streaming services are an excellent option if you have a stable internet connection. While they may involve monthly fees, they eliminate the need for physical equipment like antennas.
By using HDTV antennas or streaming services, you can enjoy local channels with minimal effort and modern convenience.
Conclusion: Enjoying Local Broadcasts with Antennas
Successfully connecting an antenna to your Samsung TV can significantly enhance your viewing choices and cut costs on cable bills. By following the steps outlined in this guide, you will learn how to connect antenna to samsung tv effectively. Furthermore, being aware of troubleshooting techniques and signal enhancements can help you maintain a great viewing experience.
As you explore the world of over-the-air television, remember that achieving quality signals requires some adjustments and occasionally troubleshooting. With persistence and the proper setup, you’ll be able to enjoy your favorite shows, live sports, and local news without missing a beat. Embrace the flexibility of accessing free broadcasting channels with a well-connected antenna, and enjoy countless hours of entertainment at home.